

What Steel Sheeting Is Used In Auto Body Repair
Sheetmetal is at the heart of automotive metalworking. From the well-nigh basic apartment-sided race motorcar to the well-nigh exacting restoration, if you lot're working with cars you'll soon exist working with sheetmetal. Some of the exercises already discussed in this book accept involved cutting and bending bones flat sheetmetal. In this chapter, nosotros'll look at shaping and bending sheetmetal into more useful parts.
Basic Sheetmetal Work
Like many skills, working sheetmetal is easy to start and hard to do well. Yet of all the skills in this book, sheetmetal fabrication is probably the easiest to master. Much of sheetmetal piece of work is accomplished without welding or other heat-related processes. You tin can undertake a sheetmetal project with zilch more than than some aircraft shears and a benchtop brake and get good results. Throw in a hardware shop pop-riveter and a manual bead rolling bicycle and yous're well on your style to professional output.
Materials
Sheetmetal generally comes in three forms—mild steel, aluminum, and stainless steel. Of these, aluminum and mild steel are by far the most commonly used for automotive projects.
Sheetmetal fabricators prefer aluminum for dashboards, bulkheads, and nigh other purposes because it is light, soft, and easy to work with. The downside to aluminum is that it tears easily and yous really demand a TIG or spool gun MIG setup to weld information technology. But this is a small-scale tradeoff against the lite weight and ease of use. Aluminum also polishes upwards nicely and doesn't oxidize like steel. Information technology can be anodized with color, painted, and even comes pre-coated if you like. The cutting projects from Chapter 4 were executed in sheet aluminum precoated with red paint and covered with a protective plastic sheet so that the blemishes created during the working process peeled right off with the plastic cover.

Whether you're pounding a dented body panel or fabricating an entire custom interior for a race automobile, you lot're bound to work with sheetmetal in the automotive world.

Sheetmetal comes in various materials and thicknesses, but the processes by which y'all plough a flat sheet into something useful are ever more or less the same.

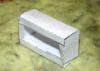
With a footling work, a basic sail becomes a precision part, like this Subaru rear differential skid plate from Primitive Racing.
For fenders, door skins, firewalls, and some critical structures, mild steel is preferred. While information technology is harder and heavier than aluminum, it's also more forgiving of errors and doesn't work-harden as much. So you're less likely to rip or tear mild steel. Steel is besides easier to weld.
Take a look at whatsoever project you have in mind and the correct material for the job should be obvious. Less obvious is the thickness, or guess, of sheetmetal to use. For example, sheetmetal of various materials comes in a diverseness of thicknesses.
Choosing the correct sheetmetal is a function of considering the projection you're undertaking and the strength and quality of various materials. Obviously, thin sheetmetal won't practise for a car floor that has to concur the weight of a driver in a seat, merely in general, you should attempt to choose the lightest fabric that volition serve your purpose.
For example, for a bulkhead, you generally want at least .063 aluminum, and that assumes that you lot are using your dewdrop roller to put some shape into the canvas for force. For a weight-begetting flooring, employ 14 or 12 approximate steel. Remember that y'all're ever trading off weight against forcefulness when choosing a gauge of sheetmetal to apply. Many racing organizations volition specify the minimum adequate estimate for sheet metal in disquisitional applications such as firewalls and protective enclosures.
Measuring Sheetmetal
When you measure a sheetmetal project, recall that you can create an entire 6-sided box from a single piece of apartment sheetmetal. It's a thing of knowing which small pieces to snip out and how you will curve it upwards. For an piece of cake example, disassemble a cardboard box and spread information technology out. If you split only those seams that are stapled or glued together, you can run across that it started as a flat sheet and was aptitude to shape with just a few seams joined up. Sheetmetal works the same way. The dominion of thumb with sheetmetal is that you need to account for all sides, but because the bends tend to be sharp, you don't accept a large actress curve calculation every bit with tubing. You do accept to measure enough, however, to make your attachments. So for an angled corner, information technology's not enough to bring 2 raw edges together. Leave a little extra on one side to bend in and have a identify to rivet, weld, braze, or otherwise spike your seam.

This complex manual tunnel cover is made of mild steel. The pieces were carefully cut, handhammered on a buck, and welded together for an exact fit.
Cutting Sheetmetal
Of all the products that automotive fabricators use, sheetmetal is the easiest to cutting. You lot don't need expensive tools, just they make your life easier. A large, gratis-standing sheetmetal shear is great for straight cuts in sheets up to 8 feet long. A smaller benchmounted shear is useful for about projects. But many fabricators get along just fine using but aircraft shears.

Information technology's convenient and fun to use every kind of sheet metal tool such as this total size jump shear, but yous can go by nicely with but a gear up of basic hand shears.
Whatever tool you lot utilise, take your fourth dimension cutting sheetmetal to get practiced results. Lay out your pattern in felttip pen on the metallic and be sure to note the side on which y'all want to cut! Yous can always trim a little more, but if yous cut likewise small, you have to outset over. Sheetmetal never goes as far as it looks like it volition when you lot're handling the big sheet, then give yourself plenty of extra.
Bending Sheetmetal
Getting squeamish crisp bends in sheetmetal is the marking of the true craftsman. The all-time and easiest way to exercise this is with a sheetmetal leaf box and pan brake.
Only hither again, these are large, expensive, free-standing tools. Their weight and size help make perfect, crisp bends. Only you tin get by and do good piece of work with a simple demote-mountain leaf brake. For boxes and more complex shapes, be sure to get a box and pan restriction with adjustable fingers so that you tin put a curve in a function that already has a crosswise bend. Run across the project to create a basic box later in this affiliate for details.

Russ LaFontaine makes a race car body panel with a box and pan brake.
For smaller jobs, many fabricators get reasonable results with a machinist's vise. Y'all tin can brand brake jaws from bending aluminum that will help you. Use aluminum, wood, or some other soft metal, even so, to avoid damaging your piece of work. And then the trick is just to bend slowly with as much pressure every bit possible right at the bend. That'southward how a brake works—it applies even pressure right at the bend.
Bead Rolling
The critical tool that sets a sheetmetal fabricator apart is a dewdrop roller. This tool puts a step or ridge into your sheet work. This allows you to put a little bit of depth into a piece of sheetmetal, increasing the cross-section of the sheetmetal without increasing its real thickness. That cross-section makes the sheetmetal shape more rigid. That's why you see professional jobs that include a number of ribs or raised areas worked into the sheetmetal. This helps finish oil canning, where the body of the sheetmetal panel tends to wobble back and along.
A bead roller is a simple tool a wheel or motor operates 2 matched dies. These dies can create a raised (or recessed) ridge or a singlesided stride in sheetmetal when you squeeze the metal and roll it through the dies. The dewdrop roller also includes an adjustment lever that controls the space betwixt the dies. But place your sheet betwixt the dies, snug down the lever, and give the wheel a turn. The metal is pulled through the die and the shape of the die is transferred directly to your sail. One time transferred, the shape is called a bead—presumably due to its resemblance to a welding bead.

Russ Nyberg demonstrates making a step in aluminum canvas metallic with a bead roller. This cheap tool turns flat sheet into customfabricated panels.

Raising a stride in the middle of this panel helps proceed information technology firm, and it looks great, besides.
You can besides observe dies that make a thin raised line in sheet for embossing, or dies that make an bending bend at the edge of a slice of sheetmetal. This office is different from a brake because a brake makes straight line bends, and the bead roller allows you to follow a curve as you lot move the canvas through the auto. This is handy if you need to make a lip effectually a curve. A manual bead roller with a option of dies is an cheap add-on to your shop, and gives your sheetmetal projects a professional wait with just a little exercise.
Lip-Rolling Sheetmetal
Ane of the most common requirements is to fold the edge of a slice of sheetmetal over onto itself to create a lip. This is called a hem in sheetmetal work, like making a hem in sewing. If you accept a die to put an angle in the border of a piece of canvass, y'all can start a hem in your dewdrop roller, only to use a bead roller to make a hem is typically a 3-step process with progressive dies. The advantage of this process is that you lot can brand a lip on a curved piece. You have to end that lip with a bit of hammer work, however. More than often, fabricators make a nice sharp bend by 90 degrees in their restriction, then open up up the brake and fit the bent border into the restriction and use the endmost action of the brake to consummate the fold. This technique makes a proficient clean straight-line hem.
Copying Body Lines
One of the toughest challenges in sheetmetal forming is making a piece that follows a complex curve or cut line in a car's bodywork. Automotive body panels are typically stamped using huge dies, and the whole piece is shaped in just a few steps. If you have to replace a piece of metal with a complex shape, it'south probable to crave all the tools of the trade.
For making complex curves that is, curves in more one direction—you really need an English wheel, or be prepared to spend a lot of time making a model (called a cadet) of the shape and hammerforming the metal on the buck. By moving the sail within the English bicycle and rolling it back and forth, you tin gently stretch the metal to create the desired shape.

Cutting lines are more than difficult and require hammer forming. This is where your dewdrop roller comes into play. Detect (or make) the correct dies to go the right angle of curve or raised bead in the metal, and then run your sheet through, following the curve of the cutting line. This is much more fine art than science, and depending on the slice you are replicating, could take several attempts.

To make a hem in a straight edge, first curve the lip past 90 degrees, so open the restriction wide enough to insert the bent lip.

All you take to do is close the restriction again to fold over the hem. Y'all get a dainty, crisp hem with this technique.

Custom motorcar door formed entirely from xvi gauge aluminum. Curt Oliver used an English wheel and hammer forming techniques to make this part. Notice how the cut line of the fender follows through the door. Copying lines like this takes existent talent and refined skill.
Nevertheless another tool (in that location are ever more tools to purchase!) used to brand compound curves in concert with the shot pocketbook is a slapper. This is a modified wooden or metal hammer that looks rather similar a spatula. As the proper noun implies, you slap the sheetmetal against the shot handbag or cadet that you've made. A slapper is ordinarily wrapped in leather to soften the edges of the blow and get smoothen results.
When you've got the bones shape, be prepared to do some more massage to get it integrated and welded into your car'southward bodywork. This tin involve hammer forming, hammer welding, and then traditional hammer and dolly bodywork to smooth information technology into identify. The difficulty of recreating complex bodywork lines is why there's a thriving market in replacement body panels fabricated from the original dies, or dies made to match the original function!
Welding Sheetmetal
Another top challenge for sheetmetal workers is welding sheet. Considering the material is and then thin, your welder is likely to melt holes directly through the fabric. Low power is key here—use the everyman power setting available on your welder. If information technology's non enough to beginning an arc or penetrate the material, raise the power in the smallest possible increments until you get a good weld. Be certain to test your welder on like materials before you lot weld on your project!
TIG welding is pop with sheetmetal because the foot pedal control on a TIG welder allows you very fine ability control and the sharp TIG tip allows yous to proceed the arc very small-scale. At the other stop of the spectrum is an AC stick welder you can attempt to weld canvass with one of these, but it's about impossible to get expert results.

This body mountain brace was made from ane/sixteen-inch mild steel sheet, hammer formed, and MIG welded together. The holes remove weight but do not essentially reduce its strength.

This racing seat was TIG welded from iii/sixteen-inch aluminum canvass. Note the elementary bends made with a brake to fit the side plate.
In betwixt are the oxy-acetylene, wire-feed, and MIG welders. Of these, MIG is the best, considering of its smooth arc and adaptable power. Gas welding sheetmetal takes a light touch, simply information technology can be done and many fabricators like gas welds because they're easier to smooth out and shape into the metallic. Inexpensive wire-feed welders tend to make holes in sheetmetal because of their limited adaptability. If you plan to do a lot of sheetmetal construction, information technology may exist worth your investment to purchase a spot welder.
Riveting
Rivets are a common fastener solution for semi-permanent installations. Near rivets used now are bullheaded pop rivets. They are chosen blind because you don't need to have access to the back side of the work to install such a rivet. Just drill a hole, insert the rivet, and use your pop riveter to pull on the shaft until it breaks off.
Traditional rivets required admission to the back side of the piece of work, and the rivet was spread by upsetting the rivet shaft betwixt a hammer and dolly. Popular rivets are ordinarily made of aluminum, and occasionally mild steel. They work well for depression-stress applications.
If you want to keep something in place forever, weld it. If yous desire to take it off at present and again, apply screws or bolts. If you want to take it off at a moment'south notice, utilise Dzus fasteners. But if you want to keep something in place a long time, but go far like shooting fish in a barrel to remove with a little work, rivets are a great choice.
Rivets come in a variety of head and shaft sizes. You lot can become pop rivets down to one/xvi-inch shaft size up to 3/16 inch at your local hardware shop. You can also cull a depth for the rivet if you're just joining 2 sheets of metal, a shallow depth works best. If you're riveting a thick sail to a piece of angle iron, you need a deeper rivet. If yous're not working blind that is, you have admission to the back side, y'all can also become washers designed to add extra grip to your rivets. Put the washer on before y'all squeeze the rivet and the washer will be held fast on the back side of your work.
To remove a rivet, you simply drill out the center. The dorsum side generally falls away, so if you are using the rivets blind for example, in a piece of box tube you'll accumulate a bunch of erstwhile rivet bits in your construction. Just that'south OK they don't weigh much.
Ane derivative of rivets that auto fabricators observe handy is the riv-nut. These go by a number of merchandise names, but the blueprint is that when the rivet is set, it provides a threaded pigsty suitable for a auto spiral. A riv-nut requires a special tool for installation, but they're a godsend for making removable panels that must exist more solidly affixed than Dzus fasteners allow.
Sheetmetal Projects
The following projects accept yous through the basic skills of sheetmetal fabrication. It's causeless that you lot have a brake, bead roller, and some means of cutting the sheetmetal. Yous can become by with aircraft shears, but larger tools brand your task easier.
Making a Box
Our starting time project is to brand a basic box. This involves measuring, marking, cutting, and bending a slice of aluminum sheet. We used 22 guess aluminum that has red pigment on one side and white on the other. The reddish side is also covered with a protective plastic pare that you lot remove when you're done with your piece of work. Information technology helps keep the workpiece free from scratches.
1: Consider the drawing on this folio. This is the plan for a box. It's drawn as half dozen ten 8 inches, but yous can scale this upwards or down equally needed. Just scaling this project downward would be difficult to do. We scaled it up to 12 ten 16 inches for our example photos, and it was still about as pocket-size every bit our big restriction could handle. The point is, the cartoon works for whatsoever three:iv ratio measurement, such as 15 ten 20 or xviii x 24.

A riv-nut tool allows you lot to set a rivet that leaves a flush and threaded hole. It'southward perfect for mounting things onto sheetmetal bulkheads, dashboards, and consoles.

This switch plate is mounted to its panel using riv-nuts. The installation is clean and professional-looking. Riv-nut tools are not expensive, and should exist in your inventory.

ii: We used a basic computer drawing program to lay out our bends and cuts. This allowed us to think through what we wanted to make and how we planned to make it. The bends are noted with dashed lines, and the cuts with solid lines. The shaded areas are to be removed before we bend upwards the box. Then we printed a copy to test our thought. We cutting out the shape and folded the paper to brand sure that our idea would work.

We printed out our blueprint and cut it out equally we planned for the metallic, then folded it up to brand certain our plan would work in the brake.

Here's the paper box all folded up. We're confident the canvass metal will fold in the same way.
3: Next, copy your drawing onto the piece of aluminum you lot're going to use. Use your carpenter's square and tape measures to become all your measurements and lines correct. You can draw it on both sides or but the back. It's convenient to be able to see the plan from both sides, but the back is more than important equally brakes bend from the back side.
Here's the same drawing, executed on a larger sheet of aluminum. We fabricated the measurements and used our straightedge to draw the lines. We'll cutting from this side, but we'll besides make the same marks on the white behind for the bending procedure.
4: Cut abroad the parts yous don't demand. We used the large freestanding shear to cutting the bones rectangle and and so our corner notcher to get rid of the edge pieces. Nosotros like the nice sharp cuts the shear and the notcher make, but we used aircraft shears to take out the triangles from the ends of the box and make the end cuts for the riveting tabs. You tin do the whole project with shears if that's what you've got.

Most of our cuts are right angles from the edge of the metallic, so we were able to utilise the notching shear. This gave the states sharp and authentic cuts.

When the cutting is done, you tin see that the aluminum matches the pattern we made. We cut out the triangles with ordinary aircraft shears, and made snips at either end.
5: When yous're washed cut, information technology's time to curve. The order in which you make your bends is critical. Start from the outside and piece of work your way in. Offset, bend the bottom lip on either side.

Start bending with the long sides at the edge, then bend the stop lips upwards.
6: Side by side, bend the bottom lip on either finish of the box. This is where y'all made those two cuts on either stop. Those cuts take to be able to fold into each other, so printing the heart one in a little before the next bends.

This is where you lot need to employ the moveable fingers on the box and pan brake you lot couldn't make these bends without allowing some space for the previous bends to travel through the restriction.
7: Now brand the two central bends along the long axis of the box. This is where you have to adapt the dies (the teeth) in the restriction to allow for the finish lip bends yous made before. Most adjustable brakes allow yous to make space for prior bends. If your brake does not accept that adequacy, you might take to skip step 6 and hand-bend the terminate lips later with pliers.
viii: This footstep is tricky. You lot demand to re-conform the brake dies to fit the shorter central terminate bends, but even with the brake adjusted for the bends, you won't be able to go a full 90 degrees into the sheetmetal. You'll go 45 degrees before yous encounter your prior bends. Bend both ends as far as possible. Finish upward the bending by pressing the ends in, holding the bend location firmly against your workbench to make a squeamish pucker. You might even be able to become a dolly in there to curve confronting. You lot might have to bend open the lips to go everything to fit, but they'll curve back again.

This motion picture shows the fingers of the brake adapted for three-D bending. Even with this adjustment, we'll merely exist able to brand this bend about 45 degrees in the brake.
9: Finish upwards the bending by pressing the ends in, holding the bend location firmly confronting your workbench to make a prissy crease. You might even be able to get a dolly in at that place to curve against. You might accept to curve open the lips to get everything to fit, but they'll curve dorsum again.

To concur all the bends in place, put a hole in each corner through all the layers stacked up there, and so pop-rivet the joint.
10: Your box is at present almost washed. Have it over to your drill press and clench the corners so they're squeamish and tight and square. And then drill a hole in each corner. Information technology should laissez passer through the iii layers of aluminum stacked up there. Put a poprivet in each hole and that completes your structure. Make sure your poprivet size matches your drill bit!

When yous're done, you've got a corking box suitable for a switchplate in a race car or to comprehend something like a fuel pump in a hot rod or custom. The lines drawn on the surface come up off when you peel the protective plastic sheet.
Your box has an open lesser, so it'due south good for use every bit a switch box in a hot rod or race car, or to cover something less pretty in the trunk or engine bay. Truthfully, y'all could brand a serviceable box without the diagonal cuts and with ane less set of lips just cut a square out of each corner of the original rectangle. It'll bend upwards easier. But look at the amount of metal in the corners you lot tin now weld (carefully!) or braze up those edges, put a lid on the open side, and have a fluid-tight box for an overflow tank.
Optional: If you take a bead roller, why not put some ribs or a raised or recessed step in your box? While it's still a flat piece of aluminum, only after you've got the pattern marked for cutting and bending, go ahead and use your roller to put some shape in the metal. It'll brand this strong design even stronger, and information technology looks skilful, too!
Making a Bulkhead
Cut direct lines in sheetmetal can be a challenge without a large shear, only cutting long curved lines has to be done by hand, and yous want it to fit well. Bulkheads tend to be large flat or curved sheets with intricate work at the edges to fit whatever installation yous're covering.
About bulkheads that are put into hot rods or race cars are made from aluminum it's easier to work with, it's lighter, and it shines upwards nicely. If you're planning to make a firewall, use sheet steel. You desire that extra protection.
Follow these steps to make an aluminum bulkhead from eighteen or xx gauge aluminum:
ane: Go a supply of thin paper-thin from an art supply store. This material generally comes in 24 ten 36- inch sheets and costs less than a dollar per canvas. It'due south perfect for templates because it cuts easily, you tin mark on information technology, and it holds upward well enough to apply over and over again. Also, get a good heavy-duty pair of paper shears to cutting it.
2: Using a felt-tip marker and the cardboard, brand a careful template of your bulkhead. Pay special attention to roll bar tubes or other obstructions you'll have to piece of work around. Cut the cardboard to fit perfectly up to all edges. Also, pay attention to the size of each piece of the bulkhead. This is primarily express by the size of your brake, if you are planning any bends in the sheet. Besides consider your ability to become the shape you desire into the sheet with your dewdrop roller.

Fit your paper-thin template snugly upward to all mating surfaces, specially under windshields.

Don't be afraid to bend the template to piece of work effectually corners and around obstructions such equally whorl cage components.
iii: If you lot program to have a removable admission console, now is the time to plan for it. Leave most three/8 inch of overlap for all adjoining pieces. This is plenty space to rivet, screw, or fifty-fifty weld the pieces together. If your template requires several pieces of cardboard, mark them carefully in relation to each other.
4:Transfer your template to the aluminum with a felt-tip marker. Mark the side of the line where you plan to cut. Check your marks and remeasure the auto for perfect fit.

Leave about three/viii to 1/2 inch for a recessed lip. This allows you to adhere two pieces and still have a smoothen surface. That'southward yet another reason to accept a dewdrop roller.

When you've got your template just right, transfer your design to the sheetmetal.
5: Cut out your bulkhead pieces and mark your overlaps. Be sure to striking every edge with your deburring tool! Also, mark any shape you program to put in the metal with the bead roller. And so take each piece to the roller and work the shape into the metal. This adds a professional look to your project and also helps make the bulkhead solid. A perfectly apartment sheet wobbles dorsum and forth, sometimes making racket—and it often looks similar an apprentice chore. If you don't accept a roller, consider taking your bulkhead pieces to a metalshop and hiring them to do your bead work.

With your design on the sheetmetal you can cut with confidence. If it has a protected side, make sure that you're laying the template for that side to be facing outward.
vi: A special case of bead rolling happens on your overlap edges. You desire to put a step down in the back side of each overlap. Make the step the aforementioned depth as the thickness of your sheet material. This fashion, your panels lay flat on each other and fit perfectly. This actually enhances the professional look of your project.

Using a step die with your bead roller allows you to fit bulkhead panels together and notwithstanding accept a flush surface. The lip likewise gives y'all a identify for rivets, brazing, Dzus fasteners, or screws.
vii: When the pieces are cut and y'all've got your shape in the metal, you tin brand whatsoever necessary bends. Put each piece into your brake and bend it as closely every bit possible to the desired angle. Be sure that your bend lines line upward if you're working with multiple pieces that must fit together!

eight: Finally, go ahead and install your bulkhead. If you lot've got nothing to braze the panels to, you might accept to design a lip into your panels and attach them to the sides of the space. Alternately, y'all tin can cut some strips and bend them in the restriction to make your own mounting lips. Rivet or spiral the mounting lip to the perimeter of the bulkhead surface area, then attach the bulkhead to the lip. This is handy if you want to use Dzus fasteners or other removable fasteners to make your panels removable only call up to overlap about an inch for Dzus fasteners.

This shot shows an installed bulkhead console held in identify with pop rivets. Yous can see the panels brand room for a curlicue bar caryatid at the pinnacle and share a bead-rolled riser. The panel on the left has a recessed edge to lay flush with the panel on the correct, and everything lines upward nicely.
Repairing a Rusty Floor
In this projection, you'll cut out a rusty patch of steel and cover it and the surrounding area with new steel. This is not a restoration-quality repair, simply it volition suffice to continue a car on the route. For the specific work, nosotros plant an former GMC pickup truck with a rust-perforated area beneath the commuter's correct heel. We removed just the rustiest part of the steel and then covered the entire area with a new piece of sheetmetal. The material we used was .095-inch mild steel sheet. We corrugated the new metal on the dewdrop roller to requite it strength and stitched it into identify.
1: Look at the rusty area from both sides to ensure that zip disquisitional is fastened to the area and that no fuel or brake lines run nearby. Cooking your fuel lines while welding is a bad idea.
two: Carefully cut out the weak area. Use some practiced judgment here—you don't desire to cut out too much. You might desire to scrub the affected area with naval jelly to remove surface rust or cover it with a product such every bit POR-15 to seal the rust. Simply surface rust is not a reason to cut out original construction. Unless you're edifice a testify motorcar or concours restoration, your repair volition hold upwards better with equally much of the previous material in place equally you can keep.

This flooring is in dire demand of a repair. The right thing to do would exist to cutting out the entire floor and brand a new 1, only the owner but wanted to become back on the road equally before long as possible.

We cut the worst of the rust out of the floor, and nosotros'll comprehend the rest with new steel. We'll have to work far enough out where there's still good metal to weld up to our new slice.
3: Measure your replacement plates. If you're replacing outer bodywork, cut the new plates exactly to shape. If you're replacing a floor, make the replacement panel big plenty to tie in to good sheetmetal away from the rusted area.

4: Because this patch covers parts of two panels that come together at an angle, you can either make one panel and bend it in a sheetmetal brake, or make two panels and weld them together at the articulation. We elected to use ii pieces for this chore because the vertical panel covered a serial of complex curves in the original stamping. If your project requires ii panels as ours did in this exercise, cutting each panel to shape and give information technology ridges in the bead roller. And then curve the panel to match the surrounding metal.

Russ made the new part in two pieces and used the bead roller to give the panels some shape. And then he tacked them into place and started welding.
If you elect to brand a single panel, mensurate the total dimension required and cut the panel to size. Then mark and curve the console in your sheetmetal brake before you use your bead roller to add structural ridges to the part. Place ridges in both planes of the console before y'all weld information technology in its final location. You may need to work the panel a bit with your rubber mallet or body hammers to get a snug fit around existing curves.
5: Position the console (or panels) in identify and tack-weld them at their corners and in several locations along each edge to hold them in identify and prevent warping. If you are using two panels, tack them to each other in several locations at this fourth dimension.
6: Using the stitch-welding technique, run weld beads around the perimeter of the new metal, joining it to the surrounding structure. Exist sure to skip around the entire perimeter and weld in stitches of about 2 inches. If the piece becomes besides hot, take a suspension and permit things cool downwardly before continuing.

Russ uses a sew together welding technique to avoid warping the panels. He welds curt stretches and moves around on the projection. Eventually, all the seams will exist welded.
7: If you used two pieces for your patch, look until the perimeter is welded into place before you join the two new pieces together. Use the stitch welding technique for this articulation, also.
eight: In this projection, we had to remove the area where the accelerator pedal is mounted onto the flooring. When the new console was in identify, we drilled and re-mounted the pedal.

The last result will keep the commuter's feet off the pavement, only doesn't do much to help the residuum of that floor.
You tin can change this projection to fill gaps in bulkheads, replace truck beds, and create new floors and bulkheads for racing and specialpurpose cars.
Stretching a Fender
In this projection, nosotros'll extend a wheel arch to arrange larger tires. This is a popular drag racing modification for rear wheels. The subject car is a 1970 Chevrolet Camaro, just the principles apply to any car. This project involves cut and welding a car's bodywork, then programme on repainting if yous undertake a similar project.
one: Measure how much additional infinite is present behind and in front end of the fender lip inside the cycle well. You don't want to exceed that space, but in that location's usually quite a bit to piece of work with. Plan how much extension you would like. In the instance of this projection, we extended the cycle arch by 4 inches.

You tin can extend a wheel arch equally far as the inner structure of the bike well will allow. This curvation was stretched to within an inch of the inner wheel well.

Cutting a square makes it easy to remove strips from the forepart and back, so welding the pieces back together once more.
2: Measure and cut the outer fender skin in two squares around the bike well. Leave a tab hanging down in the centre of the cycle arch so you lot have the original lines to friction match as you work. Leave enough of material at the front end and rear of the cycle well to become a good weld and smooth over when you lot're done. So cutting an boosted strip in forepart of and behind the square you but cut out. Each strip should exist half the width of the extension you lot desire.
iii: Weld the rear half of the wheel curvation to the new rear cut in the fender, then weld the front end one-half into the new forepart cut. Yous'll take your extension every bit a gap at the superlative of the wheel well, with the tab hanging downward as your template.
The fundamental tab hanging down as a template. You lot will weld in new steel here, and it's handy to have a piece of the original as a guide.
4: Make patch panels to fit the gap at the center of the wheel arch. Make sure you account for the wheel curvation lip. Weld the patch into the gap in your fender and grind all your welds smoothen.
Larger wheels and tires commonly run both to the inside and the outside. This project was undertaken as role of a comprehensive modification plan that included tubbing the rear end of this Camaro to fit huge wheel wells where the rear seat and trunk used to be. The entire rear framework of the car was removed and replaced with a fabricated chassis. Withal, stretching a cycle well doesn't require all that work. This tin can be undertaken as a lone modification, working within the confines of the inner wheel well.

Weld all the parts dorsum in and fill up the gaps in the wheel arch with new steel. Bend in the lip, or make a hem if yous're planning to gyre the lip anyway.

You can see how this stretch has brought the cycle's arch almost to the front of the inner wheel well.

The net outcome of this project is that these large drag racing tires fit and look practiced under this fender.
Shrinking and Stretching Curves in Sheetmetal
Stretching is just the opposite of shrinking, and it's by and large used for creating a curve in metallic. In that location are lots of tools to help you practise this, including English wheels, planishing tools, shot bags, and even your bones hammer and anvil. When you're stretching sheetmetal, smoothness is key, and almost of these tools are designed to make long, polish stretches in sheetmetal.
When you lot stretch a given area of sheetmetal, y'all get in thinner and larger. You still have the same corporeality of metal it's simply spread over a greater surface area. The result is that the metal wants to bend when you do this, considering it's not stretching evenly. You can use this attribute of metal to create just the shape you want.

This air-powered planishing setup will put a bend in sheet metal if you work long enough, but is mainly used to smooth light imperfections in sheetmetal. We used information technology to smoothen our fender after hot-shrinking dents.
This is the stretcher side of the aforementioned tool. You can meet how the second bend is starting to pull the metallic abroad from the car.

This is the shrinker side of the shrinker/stretcher tool. You lot can tell because the metal is curving in toward the auto.

It's piece of cake to rip aluminum with the stretcher. If you lot've got a choice, utilise the shrinker side of the tool on this material.
Because most people don't ain an English bicycle, nosotros'll employ a more than conventional shrinker/stretcher tool. Any tool supply store has these for sale. This tool has pocket-size jaws that grab the lip of your piece of sheetmetal and printing it together or pull information technology autonomously a little scrap. By repeated awarding, the metal starts to curve equally the length at the edge is stretched or shrunk.Y'all can utilize this tool in combination with an English language bicycle or lead shot purse and the planishing tool for forming fenders, headlight buckets, or whatever kind of curved shape you need.
If yous accept a choice, the shrinking application is somewhat safer to utilize on sheet aluminum. Because sheet aluminum tears easily, it's easy to rip it apart on the stretcher. Balmy steel sheetmetal is more forgiving. The shrinker volition go out the sheetmetal with a corrugated surface at the shrunk border, but a quick trip through the planishing tool will smoothen this out.
1: Equally described in Affiliate 5, make your flat sheetmetal bulkhead and go information technology right upwards to the edge of the bodywork.
2: Make a cardboard template showing the curved border of the bulkhead to be followed with the stretched and shrunk piece.
3: Get a strip of aluminum or steel and put a 90 degree lengthwise curve in it in your brake. Choose a side that will be mounted to the bodywork and the side that will be the mounting lip for the bulkhead. Assuming that the bulkhead panel is flat, or nigh and then, you will stretch and shrink the lip to follow the curve of the template.
4: Utilize your shrinking die to piece of work concave bends into the metal, and the stretching dice to pull the metal for convex bends. Be careful if you're working with steel, and be extra careful with aluminum aluminum feels squeamish and soft to work with, simply you can easily rip information technology with the stretcher.

We're stretching this panel to curve around, then we'll fold that lip into a hem on the bead roller.

Here you tin come across the corrugation left by the shrinking tool. You can work that smooth once more with the planishing tool.
5: Piece of work patiently and evenly, stopping frequently to lucifer your work against the template you created. When it gets close, spend some fourth dimension with the planishing tool to smooth out the wrinkles made by the shrinking die. You'll lose a lilliputian curve, but you can work that back in, and having a smooth surface makes your project look better.
6: When your piece matches the template, lucifer it upwards to the installation site in the car. You can screw or rivet it into place. The slice will be somewhat damaged by work hardening, so welding it into identify is not the best thought, simply y'all can weld it into place if the materials are the same. Using screws or rivets also makes undoing (or redoing) your work easier down the route.

The finished curved console with a folded hem. You tin create a unique wrap-around dash or other interior curves using this technique.
Written past Russell Nyberg & Jeffery Zurschmeide and Posted with Permission of CarTechBooks

GET A DEAL ON THIS Book!
If you liked this article y'all will Honey the full volume. Click the push below and we will ship you an exclusive bargain on this volume. 

What Steel Sheeting Is Used In Auto Body Repair,
Source: https://www.cartechbooks.com/blogs/techtips/automotive-welding-sheetmetal-guide
Posted by: taylordese1988.blogspot.com
0 Response to "What Steel Sheeting Is Used In Auto Body Repair"
Post a Comment